


")


 March 2024 – Primary School Exam")

 MARCH 2024")
, March 2024")
, March 2024")


 March 2024")
 – All Subjects")
 Joining Instruction & Courses Offered | Apply Now")


How to Insert Picture Into a Cell in Excel Fit Image In Cell
How to Insert Picture | Insert Picture Into a Cell | Picture Into a Cell in Excel | how to insert a picture in Excel | Insert Picture | in Excel | insert pictures in excel
Question: In Excel, is it possible to insert an image into a cell (i.e., not floating atop the cell)?
Answer: Yes, you can insert an image into an Excel cell as follows. Paste an image into Excel, then resize the image and drag and drop it on top of a cell, as pictured below.
Next, right-click the image and select Format Picture from the pop-up menu and, in the resulting dialog box, select the Size & Properties tab, and under the Properties section, check the radio button labeled Move and size with cells, then click OK.
For More information and practical follow the instruction given below:
In Excel, how do you insert a picture?
You can insert photographs from anywhere on your computer or another computer you’re connected to in any version of Microsoft Excel.
You can also integrate images from web pages and internet storages like OneDrive, Facebook, and Flickr to Excel 2016 and Excel 2013.
Insert a computer-generated image
It’s simple to add a picture from your computer to an Excel worksheet. All you have to do is follow these three simple steps:
1. In your Excel spreadsheet, click where you want to put a picture.
2. Switch to the Insert tab > Illustrations group, and click Pictures.

3. Browse to the image you want to insert in the Insert Picture window that appears, pick it, and click Insert.
This will align the top left corner of the photo with the top left corner of the cell, bringing it closer to the selected cell.
To insert multiple photographs at once, hold down the Ctrl key while selecting the images, then click Insert, as demonstrated in the screenshot below:
Done! You can now resize or reposition your image, or you can lock it to a certain cell so that it resizes, moves, hides, and filters with the related cell.
How to Insert Picture Into a Cell in Excel Fit Image In Cell
How to insert picture in Excel cell
Normally, a picture imported in Excel is placed on a distinct layer from the cells and “floats” on the sheet.
If you want to embed an image into a cell, make the following changes to the image’s properties:
1. Resize the inserted image to fit adequately within a cell, increase the scale of the cell if necessary, or merge a few cells.
2. Select Format Picture… from the context menu when you right-click the image.

3. Select the Move and size with cells option on the Size & Properties tab in the Format Picture pane.

4. Re-size the picture/image so that it can fit perfectly within the cell. 
5. Place the picture in the cell.
A cool way to do this is to first press the ALT key and then move the picture with the mouse.
It will snap and arrange itself with the border of the cell as soon it comes close to it.
That concludes our discussion. To lock more photos, repeat the instructions above for each one separately. If necessary, you can even add two or more photos in one cell.
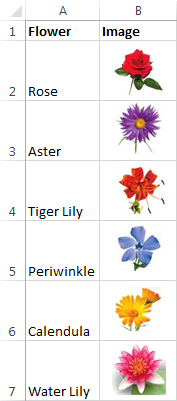
As a consequence, you’ll have a lovely Excel sheet with each image linked to a specific data item, similar to this:
The photos will now be moved, copied, filtered, or hidden when you move, copy, or hide the cells. The copied/moved cell’s image will be positioned in the same manner as the original.

")


 TIMETABLE, MAY 2024")


 PDF")
")


